System Engineering/Linux
Rhel7.7/KVM에 PCI-Passthrough/SR-IOV 설정하기
Hopulence
2021. 2. 19. 18:24
0. Kernel의 Intel VT-d 활성화 (H/W BIOS의 Intel VT-d 설정 Enable 필요)
# vi /boot/grub2/grub | menuentry 'Red Hat Enterprise Linux Server (3.10.0-693.el7.x86_64) 7.7 (Maipo)'… { … linux16 /vmlinuz-3.10.0-693.el7.x86_64 root=/dev/mapper/rhel-root ro crashkernel=auto rd.lvm.lv=rhel/root rd.lvm.lv=rhel/swap rhgb quiet intel_iommu=on } |
- SR-IOV 설정하기
1. Physical NIC의 BUS 주소 확인
# ethtool -i <NIC_Name>| driver: i40e version: 2.8.10-k firmware-version: 6.80 0x80003d72 18.8.9 expansion-rom-version: bus-info: 0000:af:00.1 supports-statistics: yes supports-test: yes supports-eeprom-access: yes supports-register-dump: yes supports-priv-flags: yes |
# lscpi| af:00.0 Ethernet controller: Intel Corporation Ethernet Controller X710 for 10GbE SFP+ (rev 02) af:00.1 Ethernet controller: Intel Corporation Ethernet Controller X710 for 10GbE SFP+ (rev 02) |
# virsh nodedev-list | grep pci| ... pci_0000_af_00_0 pci_0000_af_00_1 ... |
# virsh nodedev-dumpxml <NIC_PCI_Address>
2. Host 부팅 시 실행될 Script 설정하고 실행하기
# /etc/rc.d/rc.local| #!/bin/bash # THIS FILE IS ADDED FOR COMPATIBILITY PURPOSES # # It is highly advisable to create own systemd services or udev rules # to run scripts during boot instead of using this file. # # In contrast to previous versions due to parallel execution during boot # this script will NOT be run after all other services. # # Please note that you must run 'chmod +x /etc/rc.d/rc.local' to ensure # that this script will be executed during boot. touch /var/lock/subsys/local echo 4 > /sys/class/net/p4p2/device/sriov_numvfs <<< 4개의 vf 생성 ip link set p4p2 up <<< VF Up # vf의 promiscuous 모드 작동 for id in {0..3} ; do ip link set p4p2 vf $id trust on ; done # MAC 변조 체크 안함 for id in {0..3} ; do ip link set p4p2 vf $id spoofchk off ; done # vf의 MAC 주소 지정 #ip link set p4p2 vf 0 mac 52:54:00:d3:55:c0 #ip link set p4p2 vf 1 mac 52:54:00:d3:55:c1 #ip link set p4p2 vf 2 mac 52:54:00:d3:55:c2 #ip link set p4p2 vf 3 mac 52:54:00:d3:55:c3 |
# source /etc/rc.d/rc.local
# lspci| af:00.0 Ethernet controller: Intel Corporation Ethernet Controller X710 for 10GbE SFP+ (rev 02) af:00.1 Ethernet controller: Intel Corporation Ethernet Controller X710 for 10GbE SFP+ (rev 02) af:0a.0 Ethernet controller: Intel Corporation Ethernet Virtual Function 700 Series (rev 02) <<< 생성된 vf af:0a.1 Ethernet controller: Intel Corporation Ethernet Virtual Function 700 Series (rev 02) af:0a.2 Ethernet controller: Intel Corporation Ethernet Virtual Function 700 Series (rev 02) af:0a.3 Ethernet controller: Intel Corporation Ethernet Virtual Function 700 Series (rev 02) |
ip link show| p4p2: <BROADCAST,MULTICAST,UP,LOWER_UP> mtu 9000 qdisc mq state UP mode DEFAULT group default qlen 1000 link/ether f8:f2:1e:5d:40:b1 brd ff:ff:ff:ff:ff:ff vf 0 MAC 52:54:00:d3:55:c0, spoof checking off, link-state auto, trust on vf 1 MAC 52:54:00:d3:55:c1, spoof checking off, link-state auto, trust on vf 2 MAC 52:54:00:d3:55:c2, spoof checking off, link-state auto, trust on vf 3 MAC 52:54:00:d3:55:c3, spoof checking off, link-state auto, trust on |
3. VM의 XML 정보 수정
# virsh edit <vm_number>| <interface type='hostdev' managed='yes'> <mac address='52:54:00:d3:55:c0'/> <driver name='vfio'/> <source> <address type='pci' domain='0x0000' bus='0xaf' slot='0x0a' function='0x0'/> </source> <alias name='hostdev0'/> <rom bar='off'/> <address type='pci' domain='0x0000' bus='0x00' slot='0x10' function='0x0'/> </interface> <interface type='hostdev' managed='yes'> <mac address='52:54:00:d3:55:c1'/> <driver name='vfio'/> <source> <address type='pci' domain='0x0000' bus='0xaf' slot='0x0a' function='0x1'/> </source> <alias name='hostdev1'/> <rom bar='off'/> <address type='pci' domain='0x0000' bus='0x00' slot='0x11' function='0x0'/> </interface> <interface type='hostdev' managed='yes'> |
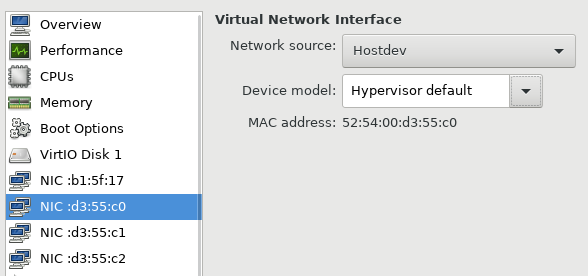
4. VM 부팅 후 virt-manager에서 확인한 vNIC
- PCI-Passthrough 설정하기
1. SR-IOV와 동일한 방법으로 Physical NIC의 bus 주소 확인
2. 오류 방지를 위해 Host에서 NIC Detach
# virsh nodedev-dettach <NIC_PCI Address>| Device PCI_0000_3b_00_0dettached |
3. VM 의 XML 정보 수정
# virsh edit <vm_number>| <hostdev mode='subsystem' type='pci' managed='yes'> <driver name='vfio'/> <source> <address domain='0x0000' bus='0x3b' slot='0x00' function='0x0'/> </source> <alias name='hostdev4'/> <rom bar='off'/> <address type='pci' domain='0x0000' bus='0x00' slot='0x09' function='0x0'/> </hostdev> <hostdev mode='subsystem' type='pci' managed='yes'> <driver name='vfio'/> <source> <address domain='0x0000' bus='0xd8' slot='0x00' function='0x0'/> </source> <alias name='hostdev5'/> <rom bar='off'/> <address type='pci' domain='0x0000' bus='0x00' slot='0x0a' function='0x0'/> </hostdev> |
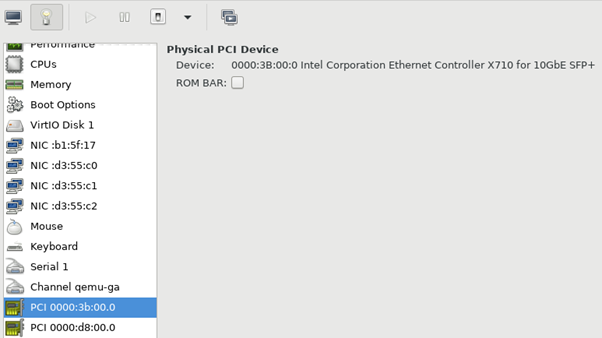
4. VM 부팅 후 virt-manager에서 확인한 vNIC